Food for friends…..

2010-04-16c.JPG

Lately, I’ve been cooking a meal every now and then for a friend in need.  It is hard to come up with something that you think someone will like…and that can easily be reheated or cooked without any fuss.  Also, you never know what the person may like or dislike.  And since we are vegetarian, it always throws an extra bit of difficulty into the mix.  So far, I have cooked lots of soup, upside down pizza, macaroni and cheese, vegetable pie…and a few others that I can’t recall.

Today I decided to cook one of my favorite recipes.  It is from Rachel Ray….”You won’t be single for long” vodka cream pasta.  It is reasonably easy to make and incredibly delicious and filling.  It is definitely a “comfort” food.

Along with the pasta dish, I love to make bread..but I don’t love all the time it takes.  So, I love my bread machine.  I usually make rolls in my bread machine…..but I have been trying to experiment with different types of bread.  One of my first experiments is making crusty french bread.  I got the recipe from the BreadExperience.com site. The recipe worked out great and it was sooo delicious!!  Though, it did take a long time….so much for the bread machine saving time…..lots of waiting and rising and more waiting and rising.  But it was worth it..though it tasted like french bread, it had more of a sourdough texture…I am going to try it again!!!  This time I think I may purchase one of those LaCroche things!

2010-04-16b.JPG

There will be a salad, but then there will also be dessert….just good old chocolate chip cookies.   I mean, what is better than a good ol’ chocolate chip cookie made from scratch!  To me, that is heaven!  When I make chocolate chip cookies, I just use the Nestle Tollhouse recipe.  It has been my favorite.

2010-04-16a.JPG

Here is the recipe for the pasta:

“You Won’t Be Single for Long” Vodka Cream Pasta

Recipe courtesy of Rachael Ray

INGREDIENTS

  • 1 tablespoon extra-virgin olive oil, once around the pan in a slow stream
  • 1 tablespoon butter
  • 2 cloves garlic, minced
  • 2 shallots, minced
  • 1 cup vodka
  • 1 cup vegetable stock
  • 1 can crushed tomatoes (32 ounces)
  • Coarse salt and pepper
  • 16 ounces pasta, such as penne rigate
  • 1/2 cup heavy cream ( I actually use 1/2 1/2)
  • 20 leaves fresh basil, shredded or torn

Heat a large skillet over moderate heat. Add oil, butter, garlic and shallots. Gently sauté shallots for 3 to 5 minutes to develop their sweetness. Add vodka to the pan (3 turns around the pan in a steady stream will equal about 1 cup). Reduce vodka by half, this will take 2 or 3 minutes. Add veggie stock, tomatoes. Bring sauce to a bubble and reduce heat to simmer. Season with salt and pepper.

While sauce simmers, cook pasta in salted boiling water until cooked to al dente (with a bite to it). While pasta cooks, prepare your salad or other side dishes.

Stir cream into sauce. When sauce returns to a bubble, remove it from heat. Drain pasta. Toss hot pasta with sauce and basil leaves. Pass pasta with crusty bread.

And here is the recipe for the bread machine crusty french bread!

Bread Machine Crusty French Bread

This French Bread recipe is from Linda Rehberg’s and Lois Conway’s The Bread Machine Magic Book of Helpful Hints. According to the authors, this method produces a wonderful loaf of bread that is comparable to the ones baked in France.  The dough for this bread is made in the bread machine and then can be baked in a LaCloche for a crust that is thin and crispy.  The recipe has both sets of directions, using the La Cloche and not using it.

Ingredients: (medium-size loaf)

1 1/8 to 1 1/4 cups Water
3 1/2 cups unbleached white flour
1 1/2 teaspoons Salt
2 teaspoons Active Dry Yeast

Directions:

1. Place dough ingredients in bread pan, select Dough setting, and press Start.

2. When the dough cycle ends, the machine will beep. Set a time and allow the dough to rise 1 more hour. Open the machine, punch down the dough, set the time again, and let dough rise another hour in the machine.

Turn off bread machine, remove bread pan, and turn out dough onto a lightly floured countertop or cutting board. Form into a smooth, round ball then flatten it with your hands.

Note: If you want to bake your bread in a La Cloche, follow the steps listed under Variation. If you prefer not to bake your bread in a La Cloche, follow steps 3 – 5.

3. Place a clean kitchen towel (not terry cloth) in a round wicker basket that’s at least twice the size of the dough. Dust the towel liberally with flour. Place the round dough in the center of the basket. Place basket in a warm place and let dough rise, uncovered, about 45 minutes until doubled in size.

4. Gently turn dough out of basket upside down onto a greased baking sheet. With a very sharp knife held almost parallel to the loaf, carefully slash the top of the dough at sharp angles in a # pattern.

5. Preheat oven to 450°F. Carefully place a small pan on the floor or bottom shelf of the oven. Add at least 1 cup boiling water to the pan. Place dough in oven and bake for 20 minutes. Remove from oven and place on cake rack to cool 1 hour before slicing. To preserve the crisp crust, do not store in plastic wrap or bag. Bread can be loosely covered or left out for up to 2 days before it dries out completely.

VARIATION: To make French bread with a crust so thin and crispy that it crackles when you remove it from the oven, try baking this bread in a La Cloche clay cooker.

1. Omit steps 3 through 5. Liberally cover the base of the La Cloche with cornmeal and place the rounded dough onto the base.


2. Slash the dough as indicated in step 4 and place in La cloche (without lid) to rise.  Cover it with a clean towel (again, not terry cloth), or use plastic wrap, then place it in a warm oven to rise until doubled in size, about 30 to 45 minutes.


3. While the dough is rising, soak the lid of La Cloche upside down in a sink of water. (Cushion the handle with a dishcloth or sponge.)*

* The manufacturers of La Cloche do not recommend soaking the lid before baking because the absorption factor of stoneware is less than 1 percent. However, the authors preferred the way the bread turned out when they soaked the lid so we decided to try it this way as well.

4. For a dark crust, preheat the oven to 450°F. Place the wet lid over the dough; bake for 30 minutes. Remove the lid and bake for another 10 to 15 minutes, until dark brown.

5. For a lighter crust, preheat the oven to 450°F. Place the wet lid over the dough; bake for 15 minutes. Reduce the heat to 400°F and bake for another 15 minutes. Remove the lid and bake for 8 to 10 minutes, until golden brown.

Janome vs. Babylock….continued…..

2010-03-31.JPG

Does this photo look familiar?  No I haven’t found my answer yet!!!!

It ended up that the Janome dealer was able to fix my janome for only $89!  I went back and forth with the decision about which one to keep!  I currently have both machines!  My Janome machine is only 4 years old.  I was disappointed that it incurred a problem….but I am glad it was finally able to be fixed.  Unfortunately, the Janome dealer closest to me closed, so I have to travel an hour to get it repaired!  Whereas the Babylock dealer is only 10 minutes away!

Okay, so this post is going to be all about the difference, I have found, between the Janome 300e and the Babylock ellure.  This is just my own personal opinion and these are only a few of the differences and comparisons.  I think I could continue this post for another 20 pages…the differences are that great!  So please, take this information with a grain of salt. 

I am writing this post because I had a very hard time finding sites that compared different embroidery machines.  I have had my Janome for a little over 4 years and I think I have learned a lot about this particular machine.  But when it comes to other machines out there, I know very little.  And I think it is very hard to find out about other machines, especially if you can’t take them home with you and really try them out!

2010-04-14a1.JPG

In general, if I had to recommend an embroidery machine to someone in the $1000 price range, I THINK I would recommend the Janome.  If a person could spend more money, I would recommend going for the Babylock Esante.  I don’t know anything about the more expensive Janome models, so I can’t give any recommendations.

 2010-04-14b1.JPG

One of the toughest things about looking at machines is driving to the stores…..none of them seem to be near each other.  I found one store that sold Janome, Babylock, Brother, and many other brands, but that is highly unusual.   A lot of stores won’t even give you prices over the phone, they tell you have to come in and check them out to get the prices.  So, that can be a very long and drawn out processes..driving all over the place to look at machines. 

2010-04-14c1.JPG

Along with buying an embroidery machine, you have to buy the software and the hoops..so those are added expenses.

First, let me talk about some problems that my Janome is having.  My Janome is fixed, but it is back to where it was…….3 months ago..still with some problems, which  I’m not happy about.  One of the problems is that the bobbin winder is broken.  It broke when the machine was about 3 months ago.  One of the other problems my Janome has been having for about 2 years now (and it is only 4 years old)…is that when the bobbin runs out..the machine doesn’t alert you right away …like it is supposed to….so it just keeps going on and on..doing nothing…until the upper thread breaks…in fact, as I was typing this, the bobbin thread ran out and kept going and “finished” the design..so the machine reset itself because it thought the design was finished….so now, I have to refill the bobbin and manually push the thread button all the way through the entire design to get to the very end and have the machine finish  those last few hundred stitches!!!!  I can’t tell you how many times this has happened..therefore, you end up “babysitting” the machine, which you shouldn’t have to do!

 2010-04-14d1.JPG

So, let me just say that it was so nice to have the Babylock machine, alert me to the fact that bobbin was about to run out!  It was wonderful!  Also, I love how it has an auto cutter, at the end of each color.  I also love how fast the Babylock seemed..it just seemed to do everything faster than the Janome..yet when I timed them, they did things at about the same rate!

 2010-04-14e1.JPG

So, now let me talk about some of the differences that I have found between the two machines.  The first major difference between the two machines is the screen.  The Janome screen is bigger and easier to read.  The Babylock screen is very hard to read..some of my images, I couldn’t even tell what they were!  I think the Janome screen is easier to negotiate..it seems more intuitive.  They separate the images by hoop size, which makes total sense to me.  The Babylock does not separate the images by hoop size and because the images are so bad, it is hard to see which image is which.  And I think the Babylock screen is just harder to navigate.

The other major difference (in my opinion) is the fact that the Janome machine takes normal memory cards.  I use a Compact Flash Memory card with 256 MB and it holds 100 images.  The Babylock machine uses a Babylock palette which uses special Babylock cards..that can’t be used with any other machine.  Each card only holds about 4-10 images.  So, personally, I liked the fact that I could use a memory card and store many images on the card and not have to go back and forth between my computer and machine so many times. 

2010-04-14f.JPG

The Babylock does have a smaller hoop size, but not by too much.  The Janome is 140mm x 200mm and the babylock is 180mm x 130mm.  Sometimes this doesn’t seem like much but other times it seems like a lot!  Both machines have a “giga”-style hoop.  I have a giga hoop for the Janome and it is very difficult to use..I would never recommend it!

I took a whole bunch of my images and made one using the Janome and one using the Babylock..there isn’t much of a difference.  Each did a very nice job.   It is hard to tell which is which, except for the smaller size, which always means the Babylock. 

Well, as stated, I could go on forever, but I think I’ve gone on long enough..if you’re looking for an embroidery machine….good luck and try them all out!  And let me know your thoughts!

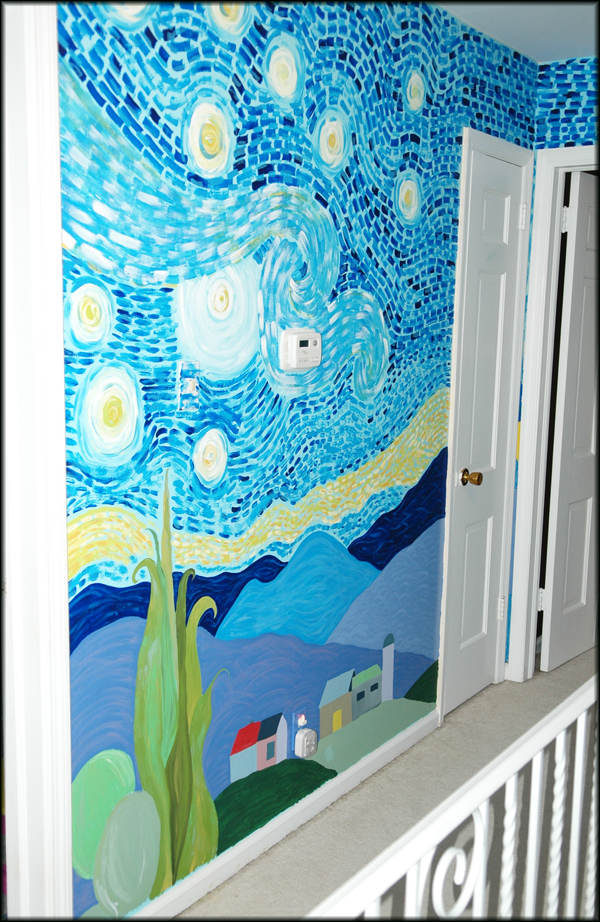
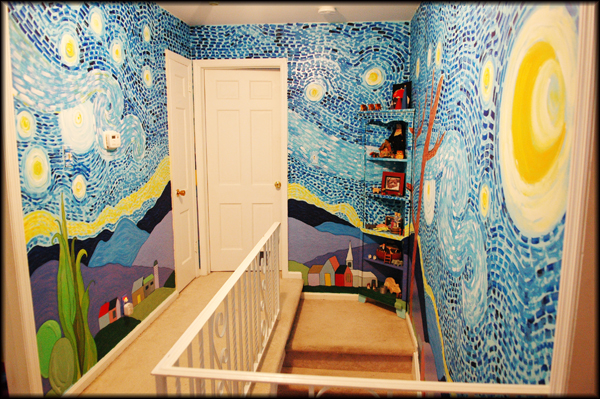
Starry Night officially completed…at least for now….

2010-04-12a.jpg

No, I really am declaring it done…really.  At least for now.   I have to…it has taken me about a year and a half to complete it.  Some months I didn’t work on it at all…and others I seemed to never stop.

2010-04-12aa.jpg

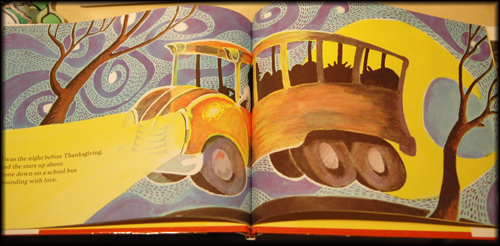
I always loved the book ‘Twas the Night Before Thanksgiving by Dav Pilkey.  It has been one of my favorites, especially since we are vegetarians.   I loved this particular drawing and I always thought it would look great on a wall..a big wall….so, I looked at our stairway going up…and figured it was the best wall.  And I had been wondering how to paint this wall.  It had been unpainted since we moved in four years ago.  I never painted such a large mural before.  First I decided on a base color and painted the entire wall that color.   Then I started with the tree…I don’t know why, I just wanted it to be the central item.  I figured this drawing was inspired by Starry Night and I love that particular painting..so it just evolved into my own interpretation of The Starry Night.

2010-04-12b.jpg

It took a bit longer than I anticipated, but that was my own doing.   It was a lot of fun to watch it progress.  I took a million photos of each stage..sometime I need to put them all together in a little montage or something…

2010-04-12d2.jpg

Now, I need to get onto the next mural project…. something I’ve been wanting to do for a long time in our living room.

2010-04-12e.jpg

I will keep you posted on the progress of the next mural……

Cloth Diaper Foundation….

2010-04-09.jpg

I just found out about a wonderful organization, The Cloth Diaper Foundation. They are a nonprofit organization dedicated to helping qualifying families all over the United States get a jump start on cloth diapering.  As Miracle Diapers has grown so has the number of families they assist. In 2009, they helped over 450 babies directly, more than 100 babies through sponsorship and local distribution, and assisted other charities with the same mission as well!

Miracle Diapers was founded in Oregon in January of 2005 to fill a need. There were many families who wanted to cloth diaper their children for health, economical, and environmental reasons but could not due to financial restrictions. Due to the overwhelming response, Miracle Diapers decided to open two more chapters by the end of that year.   The families receive free cloth diapers and only have to pay for the shipping costs.  When they are finished with the diapers, they return them and they can then be used by another family.

Their goal is to someday have chapters all over the US and internationally. Through this they hope to not only be able to serve thousands of families in need, but to be able to educate the public on cloth diapers, therefore helping cloth become more mainstream.

I have always thought this would be a great idea and I am so happy that I found a group that has started this type of process.

They accept donations of gently used cloth diapers and diaper covers and of course, money.  Right now they are getting ready for their Green Mama Benefit Auction.    It is a fundraiser on Hyena Cart, set to begin on April 22nd—Earth Day.  I can’t wait to see all the great things that will be for sale during the auction.  Of course, I had to donate one of my custom woolies!

Go check them out!

Still painting Starry Night…..

2010-04-07.jpg

Yes, I am still painting the Starry Night mural…but it is coming to an end…if that is possible…not sure when an artist every considers something “finished.”  I’m not sure if the painting looks any different from the last time I posted pictures.  I’m working on the texture of the mountains and the starry night areas.  I am also working on the outlining.  My new goal is to be done this mural by the end of the month.  I have so many other things I want to get started, but I must finish this first!

Banana Cream Pie….

2010-04-06a.JPG

I am not a huge Banana Cream Pie fan..but some people in my family are…so it is a tradition to make it ONCE a year….The recipe is quite complicated. The first time I made it, I tried to make the caramel drizzle sauce..but I ruined my sauce pan.  Now I just buy caramel sauce.

2010-04-06b.JPG

The other problem is that it only stays fresh for about two days….so you must eat it ALL within two days…not an easy task!

2010-04-06c.JPG

It requires about a dozen bananas!

2010-04-06d.JPG

I got the recipe on Good Morning America.  It is by Emeril Lagasse.  The link to the recipe can be found here:  Emeril’s Banana Cream Pie Recipe.